Dispatching Jobs to Couriers
In order for couriers to be able to process jobs, they need to be assigned jobs. This can happen in different ways and you need to decide which way of dispatch suits you best.
Option 1 – Manual Accept
If you would like your couriers to be able to accept nearby jobs on their own, navigate to Configuration > Settings and switch on “Allow couriers to accept jobs”.
On the Settings page, check the input field called “Courier’s maximum limit to accept number of jobs” – you can limit the number of jobs a courier can accept at any one time. For no limit, set it to 0.
On the Settings page, also check the input field called “Action pickup radius for courier APPs” – this is the maximum distance from the pickup point of jobs for jobs to be available to couriers. In other words, if a courier is physically farther away from the pickup point of the new job than the amount of km/miles specified here, the job will not be available to them. Only couriers within the distance specified here will be able to accept jobs. Generally, the more couriers you have, the smaller the distance can be as there is a better chance that couriers will be nearby.
To test your new settings, make sure there are couriers available on the dispatch screen, and create a test job. All nearby couriers will get a PUSH notification on their phones and whoever accepts the job first, will be able to process it (and earn the commission if you use the functionality).
Option 2 – Manual Accept with Sequential Notification
This option is the same as option 1 with the exception of the jobs not being presented to all nearby couriers at the same time. With option 1 above, the courier who accepts the job first gets to deliver it. With the sequential notification option, the system first notifies the closest available driver and gives them X seconds to accept the job. If the job doesn’t get accepted, it will contact the second closest driver and also gives them X seconds to accept the job. This way, it works through all the available drivers within the radius, and if none of the drivers accepts the job, it makes it available to anybody to accept it. This way, the closest drivers get the first chance to accept the jobs that are located nearby.
To turn ON sequential notifications, navigate to Configuration > Settings and switch on “Job Notification Method” to “Sequential”.
Next, set the “Job Notification Sequential Time (in seconds)” to the number of seconds you want to give each driver to accept a job – please note that sometimes, there is a slight notification delay for various technical reasons, so it is better to have this set to at least 15 seconds.
Courier Groups
An optional feature of the sequential notification is the ability to set up a workflow where couriers in different groups are notified about available jobs sequentially per group.
This works well together with our existing per-courier sequential notification and it builds on top of it. It allows you to, for example, notify your general couriers first about a new job, and only if none of them accepts a job, the job then gets escalated to the next group of backup couriers that can spring into action, limiting the fact that the general group of couriers is too busy to attend the task, on the delivery timelines.
Please refer to the following options under your Configuration > Settings:
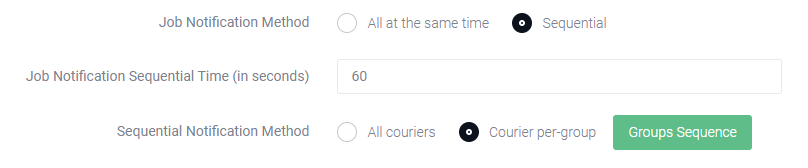
Job Notification Method:
If you select “All at the same time”, then all couriers within the predefined distance radius from the pickup point will be notified about new jobs all at the same time, and whoever accepts the job first will get to deliver it
If you select “Sequential” then couriers will be contacted one by one starting with the courier that is geographically closest to the pickup point of the job, working outwards. In this case, each courier is given X seconds to accept the job, before the system asks the next closest courier.
Job Notification Sequential Time (in seconds):
The number of seconds that you want to give each courier to accept the job before the system moves on and notifies the next closest courier.
Sequential Notification Method
If you select “All couriers” than the system will sequentially notify all currently available couriers.
If you select “Courier per-group” then the system will notify only the first selected group of couriers, before moving on to the next group etc.
The order of courier groups can be defined by clicking on the “Groups Sequence” button.
Courier groups can be defined under Couriers > Courier Groups.
Option 3 – Routes
The ROUTES option allows you to create any number of map areas, assign couriers to those areas, and let the system automatically assign jobs from those areas to the corresponding drivers irrespective of their actual location.
To start using the option, first, you need to create your map zones.
Navigate to Couriers > Routes.
On the Routes page, click the “Draw Route” button and click on the map to place your first point around the route (area) boundary. Then, click elsewhere to create subsequent points. You can double-click to place the last point and finalise the area.
Don’t worry about being perfectly precise at this point, you can always fine-tune your map zones.
To edit an existing zone, right-click it and select EDIT POLYGON.

Then, you can drag your points to their correct locations, or create new points by dragging one of the shadow points in the middle between any two existing points, which will create a new point. You can create any number of points to fine-tune your zone.
Once your “Route” area exists, you will see the following popup. Here is where you set up the functionality of the route.
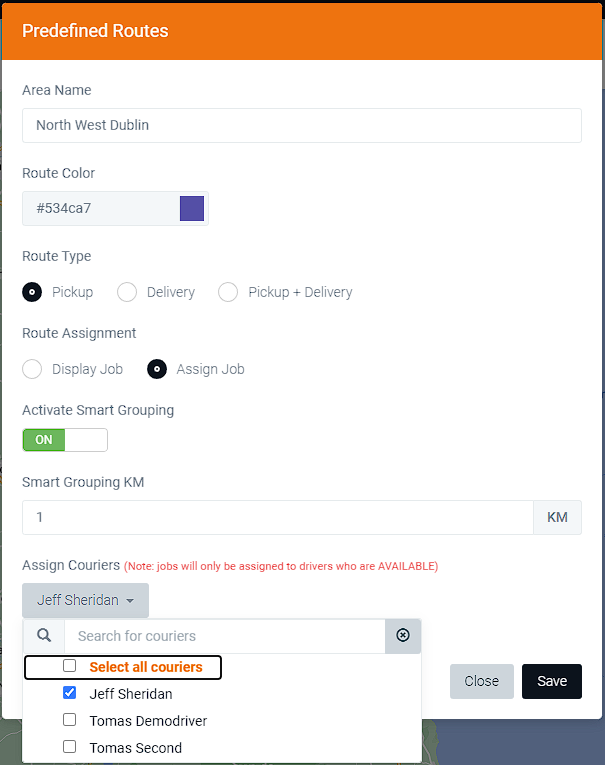
At the top, type in the route name so you can reecognise it later.
You can choose a colour of the route if you need jobs in a specific route to be highlighted in a specific colour in the dispatch screen.
Route Type
Here, you tell the system how to assign jobs to the route. You have three options:
- Pickup
In order for a job to be considered part of the route, it needs to have its pickup point within the map zone. - Delivery
In order for a job to be considered part of the route, it needs to have its delivery point within the map zone. - Pickup + Delivery
In order for a job to be considered part of the route, it needs to have both its pickup and delivery points within the map zone.
Route Assignment
If a new job is found to be part of this route, here is where you tell the system what to do with the job. You have two options:
- Display Job
Any new job within the route will be displayed and made available to all available drivers assigned to this route and whoever accepts the job first will get to deliver it. - Assign Job
New jobs within the route will get automatically assigned to available drivers in a round-robin fashion. The system will continue looping through the available drivers to distribute jobs equally among all available drivers on the route.- Smart Grouping
This option is only available when the “Assign Job” option is selected. Before the system assigns a new job to the next driver in the queue, it will check to see if there is another driver coming to the vicinity and if one is found, it will assign the job to them instead as an exception. The “Smart Grouping KM” field then allows you to enter the maximum distance from the pickup point where this rule applies.
This helps to cut down on unnecessary travel if there is another driver coming to the pickup area already.
- Smart Grouping
Assign Couriers
This option allows you to select couriers that will be assigned to this route. Please note that the system will only assign jobs to drivers that are actually available, based on the “availability” switch in their mobile APPs.
Option 4 – Manual Assignments via Dispatch Screen
If you prefer to have total manual control over all traffic, you can disable the option for drivers to accept jobs, and you can assign jobs manually via the dispatch screen this way:
- Click the driver card to expand it
- Drag the job card over the driver card and release it to assign it to the selected driver.
This way, the selected job will get “forcefully” assigned to the selected driver. If you don’t want these assignments to be forceful, you can switch ON the “Job Request” functionality. If this functionality is active, instead of “forcefully” assigning jobs this way, the system will ask the courier whether they want to ACCEPT or REFUSE the job based on their situation at the moment.
To give couriers the option to ACCEPT or REFUSE jobs that are manually assigned via the dispatch screen, look for the following option under your Configuration > Settings to switch it on:

At any time, you can click the action drop-down on a job cards and select “Remove From Current Courier”, or alternatively, “Assign / Change driver.”
NOTE:
You will maintain manual control over all jobs all the time, irrespective of whether or not you allow your couriers to accept jobs – you will always have the option to override the traffic manually.